Fitting instructions for a REMUS system

johnhorsley5

Registered user
Joined
Jun 12, 2008
Messages
72
Reaction score
0
Location
IP9 and Mons Belgium
I've just bought a used Remus Grand Prix and Y-piece for my 99T R1150GS.
I think it's complete but I could use a parts list and a fitting guide, if anyone has one they could send me or point me to.

John
 

Attachments

  • REMUS1.1.JPG
    REMUS1.1.JPG
    53.4 KB · Views: 454
  • REMUS3.1.jpg
    REMUS3.1.jpg
    27.6 KB · Views: 457
  • REMUS4.1.jpg
    REMUS4.1.jpg
    26.4 KB · Views: 454
  • REMUS6.1.jpg
    REMUS6.1.jpg
    23.8 KB · Views: 453
  • REMUS8.1.jpg
    REMUS8.1.jpg
    22.9 KB · Views: 440
Can't comment on a parts list for the 1100 I'm afraid, but from experience of fitting a similar system to my old 1150, I'd say follow these points:

1. After removing the cat and end can, slacken off all the mounting bolts including the studs holding the pipes into the head.
2. Connect the new replacement parts, but don't tighten anything yet. It's up to you whether you use exhaust gum to seal the pipes.
3. Start at the front and tighten the pipes at the cylinder heads.
4. Tighten the 2 pipe clamps into the new "Y" piece.
5. Tighten the end can clamp.
6. Last, secure the end can to it's support.

Doing it this way ensures no stress points.
 
As above, but if I remember correctly you will need a 22mm spanner to loosen the lambda sensor.

Trace the wire from the sensor to the right hand side of the engine and release it from the clips that hold it to the engine block. Next release the cat from front pipes and silencer then lower it to the ground. Loosen sensor with 22mm open-end spanner and carefully (to avoid damage to wire) rotate cat in clockwise direction to unscrew the lambda sensor. Fitting of Y pipe is basically reversal of the above.

If possible avoid loosening the down pipes from the cylinder heads, as the bolts are easily broken.

Connect Y pipe to front pipes, do not tighten clamps or fit the under frame bolts until you have the end can attached to the sub frame.

Start engine, go for a ride and prepare to be amazed when myopic pedestrians stop at the kerb when they hear you approach.

Enjoy the wonderful sound of a boxer twin.
 
Thanks for this.
a few more questions:

1. I have one coil spring. Should there be two?
2. There's a metal bracket which was fixed to the front of the can. Where does the other end go?
3. What's the small clamp for? It is too small to fit over the front end of the can
4. The large bracket clearly goes around the can. Where does the other end of the ally bracket go?

Can anyone send me pics of a completed installation?
 
Last edited:
Mate my camera got stolen by the inlaws the last time they were down. However, I can say that I have no idea what that arms sticking off the end can is for. My pipe has a support bracket that bolts on the frame just right to and above the rear footpegs; it included a rubber bung that takes the vibration of hte engine away from being transmitted via the rear subframe into the can. The y piece looks okay from what I can see... I had a remus one and I think (don't quote me) that it bolted onto the frame at the same place the cat came off... those bolts beside the centre stand bolts. The lamba probe hole should be obvious. If no one else take a pic I'll send one next week when I get the camera back.
 
You need two of the smaller clamps ( if it's a genuine remus Y piece, i've not seen one like in the picture before) as the bmw clamps are to large to use with the Y piece.

No need to disconnect the lambda under the fuel tank. Just wind the lambda up 13 turns before screwing it back in place. ;).

I haven't seen those silencer mounting attachements before. So fit the Y piece then offer up the silencer and it should all be fairly obvious what goes where.
 
Thanks guys - looking forward to the photos.
I can only assume the y-piece is Remus. I bought from someone who was only selling it for her partner.
Do I need another, second, spring?
Does anyone have the installation instructions?
 
Does anyone have the installation instructions?

Y peice onto downpipes. Insert end can onto end of Y peice. :confused:

It's a bit like asking for instructions on how to fit a rear wheel. It only fits one way, same as the Y piece and end can. :D
 
Afraid, its what he said

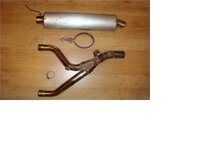
It is pretty straightforward as the parts can really only be assembled one way. The small clamps are used for attaching the y Piece to the header pipes (the ones coming from from the cylinders). You will need two of these.

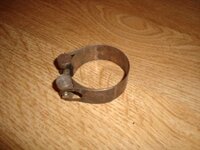
The large clamp fits round the can and bolts to frame (probably the original silencer mount, I think from memory it is the pilliion footrest hanger) Unfortunately I have no idea where the other mount goes, but once it is fitted it should be pretty obvious.

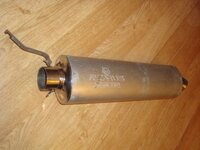
Two springs would be best, but I think you would get away with one for a short while, I suppose the only thing might be that you won't get a proper seal as with just one spring you will be putting more pressure on one side of the silencer than the other, nothing major but you may get some backfires on overrun.

Failing that, take the whole lot down to Steptoe, grab a cup of tea and let the man do his thing.....if you know what I mean!


Back
Top Bottom