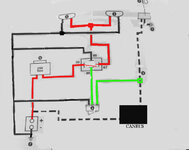
Putting aside whether you should run these lights on low beam -Does this wiring diagram make things any clearer?
Dont be concerned about a relay - it is just a switch which is activated electrically rather than with your thumb. If a current passes along the green wire to terminal 86 on the relay and terminal 85 has a wire to the -ve battery terminal, then the switch is turned ON so completing the circuit in the red wire (across terminals 30 and 87) so the lamps will light up. IF there is no current in the green wire, because the override switch (6) is turned off or the bike ignition switch is turned off, then the default state of the relay switch is OFF, so lamps are off.
In the diagram the solid lines are the wires you have to add - a new circuit from the battery to the lamps which includes a fuse and the relay switch - red lines. You also have to complete the circuit by sending a wire from the lamps back to the battery - black solid lines . You can instead fix the negative wires to the metal frame (ground) shown as the arrow heads with three bars on your original diagram, but in my view it is just as easy to send a wire back to the battery (others might disagree).
The dashed lines are ones that already exist on your bike. What you need to do is splice into the existing wiring (at 3) and run a wire from this point to the relay ( terminal 86) via an isolation switch (6). As mentioned before you then have to run a wire from terminal 85 back to the battery -ve terminal.
The switch (6) shown in diagram has three wires. This is because it assumes you are using an illuminated switch that has a small LED inside it. This is why you need another wire back to the battery -ve terminal to close the LED circuit. IF you dont use an illuminated switch you only use the two green wires
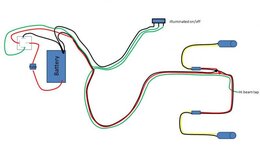
So that is the schematic of the connections that you have to make, now you have to decide where to put these switches, fuse and junctions.
Before you do that do a bench test of this circuit to make sure it works - you may have to sacrifice some wire and spade connectors but it is worth it. Obviously you cant tap into the bikes wiring, so simulate the power feed from the bike headlight by running the green wire directly from the +ve terminal of the battery to the isolation switch.
Splice location into existing (3).
You may have heard of the CANBUS. Think of it as a box(es) of tricks that you dont want to mess with. All you need to know is that there are wires that come out of it that power different components including your headlight - dipped beam and main beam - and you can tap into these to power relay switches and small LEDs without upsetting the CANBUS. You have to decide on a location that you can easily access and perform a splice your Green wire.
The dipped and main beam can be accessed most easily at the headlight. Either before the push connector into the headlight unit, or actually inside the headlight. Dipped beam is a Yellow wire, main beam is a White wire.
Since the dipped beam comes on with the ignition you can use any component supply that comes alive when you turn on the ignition. This includes the front side light, rear tail light, number plate light and accessory socket. The benefit of using the main or dipped beam supplies is that they are not powered until the engine is running - so you get full power to the starter motor which you might not if you leave your lamps on and powered through the tail light. If you use the accessory socket you might find they dont switch off until 30 seconds after you turn off the ignition. You have to do some investigation to decide where it is easiest for you using whatever splicing technique to want to use.
That is your biggest decision so dont rush into it. There are various threads in which others argue the merits of each. My advice is to tap into the main beam beacuse it looks like that is how these lamps are meant to the used (not with dipped but it may depend on your you mount/angle them to avoid dazzling)
Isolation Switch
The obvious place will be the handlebars. So you have to run three wires up the the bars to the switch. I dont suppose the switch that came with your lamps is suitable for mounting here so you may have to source another.
Relay and Fuse
I would suggest both of these are located close to the battery under the faux tank. There is loads of space and its fairly weather proof and you can fix the relay to the battery holder with a self tapping screw.
Aux Lamp Junctions
At some point you will have to join the two positive and negative wires. Probably behind the headlight.


 )
)