Fuel / temp gauge issues

Pin 2 is green in my book.

I'm going to have a measure on my bike after I've had my haircut and will report back later.

Regarding your further confirmation of your fault condition, I reckon it's your fuel sensor sending erratic measurements when the bike is upright: If the wiper on the potentiometer is faulty this could be partially rectified when the bike leans over. It is a physical device and if it's damaged it may be sending false information.

Back Soon.
 
Right,

I've had my haircut and been to look at my bike.

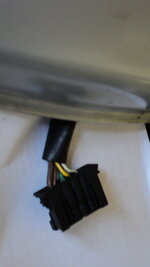
The picture below shows the black connector which runs up to the fuel pump & level sensor mounting plate on the right hand side of the fuel tank.

Pin 1 is brown and this is the machine's ground (or earth/-Ve if you prefer);
Pin 2 is green and this is the power supply to the fuel pump;
Pin 3 is yellow and this is the the end of the resistor within the potentiometer of the fuel level sensor. The voltage output from here is sent to your RID for analogue to digital conversion, I presume, to condition the signal for presentation on your display;
Pin 4 is white and is the fuel level damping sensor input which temporarily disconnects the fuel level sensor output when cornering. Ironically, this is supposed to prevent an erratic display on your RID so, another element to keep in mind.

Now the measurements:
1) Between Pin 1 (earth-brown) and Pin 2 (green) is 1.2 ohms...your reading above;
2) Between Pin 1 and Pin 3 (yellow) is 35 ohms with the bike on its SIDE STAND;
3) Between Pin 1 and Pin 3 is 16 ohms with the bike on its CENTRE STAND;
4) Between Pin 1 and Pin 4 is open circuit, i.e. infinite ohms.

So when my bike is moved between its stands the fuel level is seen to change on the RID. This is normal and that feature can be verified by taking a resistance measurement (as in 2 & 3 above) and observing that the potentiometer within your fuel level sensor is working, or at least within that portion of the potentiometers' resistor.

Now, I see you have other problems but in order to deal with this you should at first suspect that your potentiometer may be faulty at one end of its resistor which is why you need to verify its operation when the bike is on its centre stand. I reckon when the tank is full your restance measurement should be low, and as the fuel level drops the resistance should increase (I'll check on this when I'm next due for a top up). When this is done you can move on. :thumb

You still may have a wiring fault or failing RID.
 

Attachments

  • DSC01202.JPG
    DSC01202.JPG
    41.4 KB · Views: 147
Thanks DW a well thought out narrative even me as a numpty can follow.
I have similar issues so am following this thread with interest.:thumb2
 
Ditch.
Thanks for the excellent write up. So I checked the correct terminals this time.
I set the mm to 20 k ohms and the reading when on the side stand is 15 - 16 ohms. When I then stand the bike upright the numbers go mad and climb to over 100 and then it just goes to 1 lean it back over and the ohms cut in at about 130 and decrease back to around the 16 again.
So it looks like from my simpletons point of view the gauge is reading too high which is knocking everything else out on the rid with too much resistance.
Looks like during the horrid part of winter tank off change fuel filter which I wanted to do any way and see why whatever reads the fuel level reads so high and can I stop it. I guess either a stop is broken or something is bent but I don't have a clue what the gauge looks like.
Any ideas welcome
Am I barking up the wrong tree and could it be an earth issue still?
Cheers
 
I set the mm to 20 k ohms and the reading when on the side stand is 15 - 16 ohms. When I then stand the bike upright the numbers go mad and climb to over 100 and then it just goes to 1

Just checking, you did this with the connector separated? You can't measure resistance with power running through a circuit with a vanilla multimeter.

I suspect that this 1 is the meter telling you that the resistance is now infinite, i.e. open circuit and therefore no contact is being made within the potentiometer. It could be worn out or broken in some other way and you will need to look at it in more detail to verify its condition, i.e on the kitchen table. :blast

So it looks like from my simpletons point of view the gauge is reading too high which is knocking everything else out on the rid with too much resistance.

Don't worry about this at the moment, and resistance is not a force so it can't hurt your RID.

Looks like during the horrid part of winter tank off change fuel filter which I wanted to do any way and see why whatever reads the fuel level reads so high and can I stop it. I guess either a stop is broken or something is bent but I don't have a clue what the gauge looks like.
Any ideas welcome
Am I barking up the wrong tree and could it be an earth issue still?
Cheers

You will see the level sensor when you try to extract the assembly from the tank. It's a float on a long rod which requires a bit of gentle postioning to remove so, be careful and try not to bend the rod.

Also, be very careful when removing the nuts from the studs on the tank which hold the assembley in place. Use plenty of WD40, or other releasing agent, and go a little at a time because they can snap off and then you'll be seriously peeved.

So, run the fuel down so that there's less to decant, remove the tank and empty it, gently remove the plate and lift it all out. Put the assembley on the table and connect your meter. Then move the float up and down and see what readings you get. The numbers should move progressively and not jump about erratically as you have said above. You could remove the fuel pump (or just disconnect its wiring and insulate the terminals) and connect it back on the bike and adjust the float manually to see how it performs under your control whilst watching the RID.

Don't forget to order your O-ring before hand and clean up the mounting studs before it all goes back together.

Enjoy. :thumb2
 
Ditch many thanks again.The silly readings were with plug connected
Seem to think I got nothing at all with all turned off.
I will have another go though I suspect it will be the same result. Like you say if it is this then it's not going to harm the rid which is fit for the bin anyway.

While we are talking of removing the tank. I was a little daunted by doing so until this weeks fiddling has shown me where to undo bits. To remove fuel lines is it just a case of slackening off the clamps and easing out marking which joins which?
Do I need to get a set of line clamps or will the fuel only be pushed out when the pump runs?
Cheers
 
Ditch many thanks again.The silly readings were with plug connected
Seem to think I got nothing at all with all turned off.
I will have another go though I suspect it will be the same result. Like you say if it is this then it's not going to harm the rid which is fit for the bin anyway.

You need to separate the connector otherwise your resistance measurement will try to measure ALL the earth connections within your bike and the multitude of other components which have resistance; That's known as a parallel circuit and you need to check your sensor as a series circuit to ensure you are isolating it for a reliable result.
Also, your RID maybe recoverable.

While we are talking of removing the tank. I was a little daunted by doing so until this weeks fiddling has shown me where to undo bits. To remove fuel lines is it just a case of slackening off the clamps and easing out marking which joins which?
Do I need to get a set of line clamps or will the fuel only be pushed out when the pump runs?
Cheers

If you have a digital camera use that to record your connections or draw a diagram. It is possible to reuse the hose clamps but make sure they are tight if you have to remove the tanks' internal hoses. You can use this type of tool to carefully re-crimp the OE hose clamps. Your tanks' external fuel lines should have quick disconnects which have a stop valve when separated and therefore you should not need line clamps.

I just found this
http://advwisdom.hogranch.com/Wisdom/R1150 GS fuel gauge.htm

Sounds like the same problem to me
Will have a go over the winter do I need any clamps for the new fuel filter off hand
Cheers

BTW, your link does not work.

Do you have a Haynes manual yet? There's a section at the back which should help you with your electrical measurements education curve. :thumb
 
I've got a Haynes for my last bike so I can read up there on electrical
My bike doesn't have the quick releases I thought they were only on the adventure. My manual talks about line clamps. All I can see is where the flexi pipe joins solid pipe?
The link that works is the one I tried to post but explains the point.
Thanks for your patience.
 
Ok re checked plug around 7.8 - 8 ohms when on the sidestand. When standing the bike up the numbers climb to about 135 before then going open to 1.
Confirms initial thought that I need to follow the link and see if I can bend the part as shown
Off to read the haynes.
 
Right tanks off and fuel gauge out. I can confirm I have the same problems as listed on the adv link. Basically the small piece of metal the works the pointometer gets pulled to far out as the swinging part wears. Bend back in and seems to work.
After a very very quick look I pushed the metal piece down, measured the resistance when that looked ok I removed the fuel pump fuse and tested plugged in to the loom. Hey presto fuel gauge goes all the way to full without wiping off the rid. I need a little bit more time for fettling but I thinks it's nearly there. What I did note was that on mine there is a small piece of wire wrapped around one side the pulled the metal arm up to allow access to the low fuel light sensor that can help with adjusting. New fuel filter on the put it back together. Messy job this trying to get the tank empty!
 
Mine was working perfectly then I changed fuel pump, the guage only reads full? opened it a few times tested no joy.

Had another go yesterday, (holiday season here) found that when fittting new pump, I had extended the earth with a crimped fitting, since submerged in fuel I didnt insulate it, but I did cable tie it out of the way of the float arm, then fiddled to get it into tank, result was it was touching the potentiometer soldered joint so always open circuit so 100% full :blast:blast moved and all good:D
 
I tried bending the back of the float arm as per adv rider but this is very difficult and I fail to see how it will work if the joint has worn a little. There seems to be a high possibility of breaking wires and fuel pipes bending the piece of metal down that touches the pointometer thingy works for me. The reason the low fuel continues to work looks like the metal prong that touches it's pointometer is angled down with less flex so is always in contact. Hopefully applying the same to the gauge prong and angling down harder will compensate for the swing out in the float arm due to wear. It was only a mm at most but enough to lift the prong off the scale.
I will investigate further tonight
 
Well it's all back together though I did manage to break the pointometer wire the gives the signal. Doh. Soldered the joint back up adjusted where the sensor touches the gauge and several on bike tests showed a full tank with the arm in the full position and low fuel light etc. I then put the tank back together. I am praying I don't have to do that again for a long time as I didn't like doing those plate bolts up. Anyway back on the bike with some fuel added and it seems to work ok. Just pray my soldering holds.
 
Best of luck, worse case it it will fail or misread again as the hole gets slightly enlarged with wear and then its a case of a new unit - not too expensive and from my point of view certainly worth paying for - having almost run out of fuel this year miles from anywhere Mid France


Back
Top Bottom