HPN Tank and Oil cooler

majorbumsore

Registered user
Joined
Jan 2, 2009
Messages
184
Reaction score
0
Location
yorkshire England
Ok, so I bit the bullet and Ordered the HPN Tank and Oil cooler.
First of I must say, I have read some stuff over on ADVrider and HorrizonsU about poor service from HPN but I found them excellent.
I rang Klaus a few times and discussed my needs, then placed the order and the big box arrived the day he said it would.

so first stip off the tank pannels.
hpn 053rs.jpg

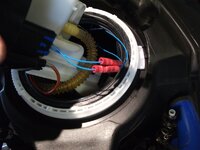
then remove the pump assembly, i used the three screwdriver technique to remove the big locking ring but you can get a tool for about 3 million quid from Bmw.A note of warning, the blue electrical connector at the top of the picture will be siezed and brittle, so dont waste time and end up breaking it just snip the wires marking which is which and use a crimp block to re attach later.
hpn 054.jpg

then remove the old tank making sure to take care with the snap lock fuel connectors.
hpn 056.jpg
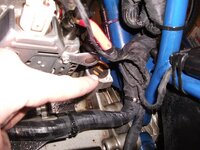
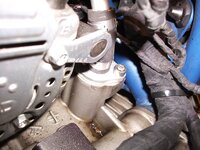
remove the oil cooler and drain any oil. there was only about an egg cup full in mine as it will have drained itself back into the sump.
hpn 060.jpg
the thing im pointing at is where the other end of the oil cooler attaches this is a spring loaded thermastatic thing so carfull the top ring doesnt pop out and fall into a crevis.
 

Attachments

  • hpn 061.jpg
    hpn 061.jpg
    106.5 KB · Views: 1,449
part two

ok a little oil on the new parts and fasten up.
hpn 063.jpg
again a word of caution the power leads are live even with the ignition off so place somthing between your allen key and the wires.
hpn 064.jpg
its a bitt of a fiddle on your own to get the oil cooler into its new position but paitience is a virtue cos they are frigile and once bent the never look as pretty again. all the parts bolts and spacers are provided but i tend to use stainless where i can and copper slip everything.
hpn 066.jpg
as you can see not much room for error so take your time.
hpn 067.jpg
 

Attachments

  • hpn 065.jpg
    hpn 065.jpg
    108.4 KB · Views: 1,410
now the best bit

putting the new tank on. it needs to go in at an angle of about 45 degrees so a bit of patience and gentle pushing is required. first some new rubber buffers and stops are tie rapped to the frame but i forgot to take photos as i was quite excited by now.
hpn 070.jpg
insert the fuel filer tube and ensure the float on the fuel level indicator is free.
those two blue wires are from the fuel level sender to the pump assemby so reconect with some crimp blocks.
hpn 071.jpg
and re fit the pump assembly.
hpn 073.jpg
take care with the fuel line snap cconnectors. inspect the o rings and ensure they snap in.
hpn 074.jpg
then fit the pannels. i used some extra nylon washers as I'm a bit anal for doing thing right the first time.

ok got the pictures the wrong way round.
 

Attachments

  • hpn 072.jpg
    hpn 072.jpg
    107.9 KB · Views: 1,383
and finaly

this is the finnished job. a few pics I think it looks better than the original pannels. I have had about 220 miles from the first tank.
I'm setting off to Austria in a few weeks so I'll let you all know what an average tank range is when touring with the Zega panniers on.
hpn 084.jpg
hpn 085.jpg
also fitted a techno flex rear shock lately, which is excellent for touring with luggage. and gives peace of mind.
hpn 079.jpg
next job this winter is to strip the front end and mes about with this.
fairing.jpg
with the intention of making it look like this.
s_-_PD_-_left_-_from_front.jpg

HPN R1200RR anyone, or should that be HP2e Adventure. either way I love it and enjoy doing the work.
thanks for looking peeps.
 
Wow cool mods and thanks for the pictures dude :beerjug:

I saw a few other threads in warmer climates where guys had to drill small holes in the rear of the fender to get more air onto the oil cooler. Just for safety do keep your eye on the temperature guage :thumb2
 
MBS

I notice one of your front seat rest grommit thingies is missing:

attachment.php


Does your seat wobble at all?

Mine was missing from new. We'd better report this to their R&D dept :D
 
Great post thank you, have you got some more pic's of the oil cooler parts/brackets.
Ive been thinking of moving mine for the side mount.
That fairing will look cool very cool.. hope it works may well have to have a go myself:D
 
you've made that install look much tidier than when I did mine...:blast but then again my tank may as well have been put on with velcro it was on and off more times than a newly weds draws...:blast

what number was your tank? I might give a clue how many are out there now....
 
Thanks for the feed back guys,
I will watch the temp when I do my run to Bavaria and Austria last week of June. thanks Mav.
Not sure what the tank number is Lo iQ, where do i look for the number.
I tell you what the quality is superb.
I am in the process of getting the NS oil feed from the oil cooler to the bottom banjo done in goodridge hose (a) it will take the small kink out of the rubber hose and (b) it will look sexy as fek.

I'll keep you posted on the front fairing mods. all the parts ar KTM 640 Adventure. I got the lights front sub frame and faring in great condition off ebay for less than a hundred quid. which belive me is the bargain of the century, the fairing normally goes for more than that.

Ian
 
Factory recall required

Spout.:thumb
You may have identified a major recall issue. my rubber grommet was missing from new as well.
someone start a new thread. this could be bigger than the whole fork thing:D

Please respond if you have not had a problem with you rubber grommets, would be a good working title.:clap
 
bam bam

only pics of the oil cooler are these. not sure if it woud side mount due to lack of space but the orriginal would cross mount like this with the right tubing. the main mount is via the horn bracket. hope this helps.
hpn 058.jpg
hpn 068.jpg
 
the number is under the tank right hand side I think mine was 18 I think from memory.

I'm not taking it off to look anyway...:blast I would have been handy had mine come with instuctions... I'm going to make a oil cooler guard for mine to give it some protection.

the idea for the fairing I think will look ace, why the hell did I not think of that....:blast
 
tank

guys, i installed whitepower front end and hpn tank. Now i have no lock on steering..
im assuming this is because of changing front end.
i had bike shop do it......has anyone else changed front and had same prob?
 
guys, i installed whitepower front end and hpn tank. Now i have no lock on steering..
im assuming this is because of changing front end.
i had bike shop do it......has anyone else changed front and had same prob?

majorbumsore and beachman Which WP front end did you go for?

What is the set up etc
 
bam

i bought this wp stuff off jan udlom, a member here. I will find details for u.
I have not dialled it in , had the shop do it, so i need to go to suspension dude now and put ohlins on back and then set it up.
 
majorbumsore and beachman Which WP front end did you go for?

What is the set up etc

Hi Bam Bam.
I'm sorry to say I cheated and just used WP springs.:augie

I had the rear shock serviced and rebuilt by Firefox racing in Keithley. I found them excellent to deal with and knowledgable (even if they have never heard of a HP2.:blast
I had the strut lenth in the rear shok reduced by 10mm, this reduces the actual seat hight by about 30 mm which means i can wind up the pre load when I've got my touring head on without making the bike too tall for touring with luggage.
i also dropped the fork legs by 15 mm to balance the bike.
does that make sense to anyone but me???:nenau

I found the perfect preasure on the air damper for my riding style made the bike too tall for a short arse like me.

so far so good.
:thumb
the bike still sits well and you really cant tell the seat hight has changed.
 
Wow cool mods and thanks for the pictures dude :beerjug:

I saw a few other threads in warmer climates where guys had to drill small holes in the rear of the fender to get more air onto the oil cooler. Just for safety do keep your eye on the temperature guage :thumb2

I have HPN tank and original (small) oil cooler, I changed the front fender.

DSC_1732.JPG


DSC_1733.JPG


Back
Top Bottom