R69

Thank heaven for some progress, I was missing my fix. I don't think the people doing the powdercoating realise how many people they were depriving of their entertainment.

Now then enough :beer: get on with it:D:D

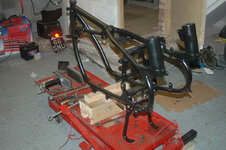
Right, here's a bit to be going on with.
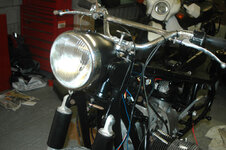
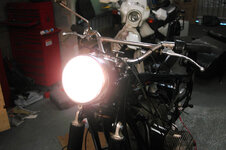
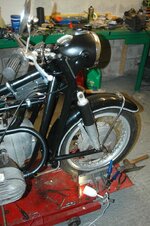
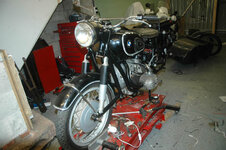
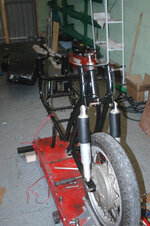
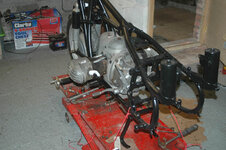
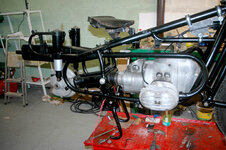
After seeing hew Shep's bike came together, I thought side stand, front forks and wheel would make it more stable, so that's what I did.
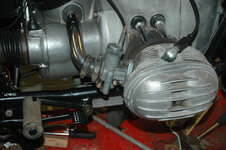
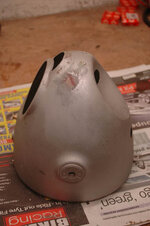
Powdercoat man said he'd only mask where the bearings go, rather then put bolts in all the holes, reasoning that when the bolts were removed, they would leave a shoulder of paint which could crack off when I assembled the bike. I had the lightly ream some of the bolt holes before the bolts would fit, but there's no sharp edges of paint to worry about.
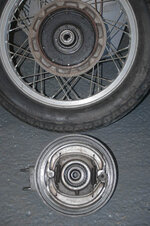
Side stand on first, followed by front forks and front wheel.
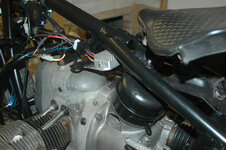
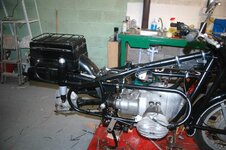
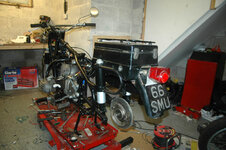
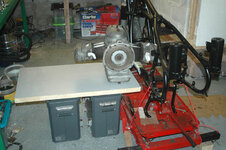
I've now got a stable platform to fit the engine and all the rest.
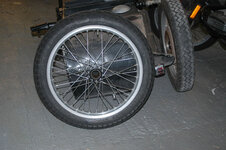
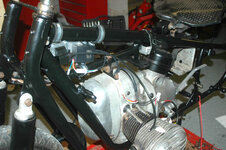
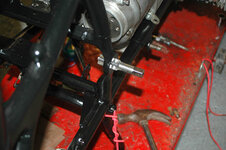
After the 3 day nightmare removing the through-bolt holding the leading link on, it was a breeze to re-assemble with new bearings and bolt.
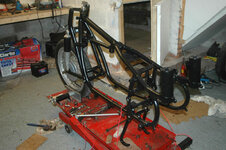
I'm initially going to assemble the front end in the 'solo' position, and will use the bike without the sidecar for a couple of weeks until I'm happy that its not going to fall apart, and I'll be able to work round the bike should I need to get the sledge-hammer out.
 

Attachments

  • sidestand on.jpg
    sidestand on.jpg
    105.6 KB · Views: 214
  • forks front wheel on.jpg
    forks front wheel on.jpg
    103.2 KB · Views: 214
  • forks front wheel on 2.jpg
    forks front wheel on 2.jpg
    110.5 KB · Views: 212
It's all looking good Bill,

I have a collection of wheel bearing spacers in different thicknesses should you need them please give me a call.

Cheers Graham
 
Thanks for the offer Elvisto, kind offer.

Engine and box in today.
As I had no-one to help with the lifting today, I found a use for some panniers and the cutout from the worktop sink :D
Slid the engine as far over as the frame would allow, straddled the bike and gently lifted the engine in, trolley jack to support it while I located the bolts and it's in. Box is light enough to lift and hold with one hand while slowly cranking the kick-start to align the spline, and in it went.
I'm trying not to perform a restoration, merely give it a new lease of life, and so am using as many of the old bolts and fittings as I can. It may not be to everyone's taste, but I quite like the shabby look, as long as it's mechanically sound. Bolts can be replaced at any time, I'm not one of life's polishers
 

Attachments

  • engine going in.jpg
    engine going in.jpg
    104.3 KB · Views: 182
  • engine box in.jpg
    engine box in.jpg
    107.2 KB · Views: 185
Patched the headlight and have given it a first coat of paint.
Loose fitted the new electrics which fit under the tank, except the rectifier which I think will go somewhere under the saddle.
The tank is quite narrow (3inches?) underneath, and the throttle 'y' piece was mounted where the coil and advance unit go, but I think I can undersling it in a similar position. The left exhaust pipe crosses over the engine around that location as well, all a bit tight. I'm having to temporarily mount the saddle, battery box, exhaust and tank to make sure nothing is rubbing or in the way.
The ratio numbers stamped into the final drive read 7/27, and after searching though RealEOM.com site, I find it comes off an R60 and is the low ratio option for sidecar use, so that's another different bike part.
Both front and rear wheel are identical, that's the rear in the 4th picture, with the single leading shoe brake, the front also has the splines which mesh with the final drive, but they do nothing when on the front.
Waiting for an M20x1.5 tap to arrive as the paint overspray in the threads of the rear swinging arm mounting have proved too much for the crummy, cheese-metal £24 BM special tool to cope with, and I had to screw them back out with the 5p special tool I made to remove them :blast
 

Attachments

  • headlight filler.jpg
    headlight filler.jpg
    67.9 KB · Views: 295
  • headlight 1st paint ( not ferkin bad).jpg
    headlight 1st paint ( not ferkin bad).jpg
    61.7 KB · Views: 295
  • electrics tryout.jpg
    electrics tryout.jpg
    108.9 KB · Views: 298
  • back wheel exposed.jpg
    back wheel exposed.jpg
    86.5 KB · Views: 295
Tap arrived, so I cleaned out the threads and mounted the rear swinging arm and shock absorbers. Found the best place to mount the rectifier, will make a plate for it to attach behind the rear petrol tank mount, it will be hidden up under the tank. Exhaust looks good - just loose fitted to make sure there's room for everything. The swinging arm mounting allows for up to 20mm of lateral adjustment, and I've set it a millimeter or two to the left of centre. This is because the is very little room between the exhaust and the tyre, and every little helps.
 

Attachments

  • tap.jpg
    tap.jpg
    84.5 KB · Views: 266
  • swing arm and exhaust mounted.jpg
    swing arm and exhaust mounted.jpg
    118.4 KB · Views: 269
Only a little progress today.
Made an aluminium bracket for the rectifier, it does fit up under the rear of the tank and still gives clearance for the tank cross-pipe, and room to access the air filter and the crankcase oil breather under the small cover at the rear of the block. Wiring loom will be next :(.
 

Attachments

  • rectifier mount.jpg
    rectifier mount.jpg
    115.5 KB · Views: 235
Soldering iron out today and rewired the handlebar dip and horn switch. Don't know what bike the unit was off but it had headlight flasher and indicators switches which the bike doesn't have. The handlebar loom was too short anyway, and was a complete botch. (pic 1).
Fitted the bars and loose-mounted the headlight to make sure it all fitted ok -starting to look like a bike again.
Took me about 1/2 hour to get the grommet over the speedo cable, boiling water and cursing did the job in the end.
The lighting for the sidecar should come from a BM-type socket mounted under the saddle. When I got the bike the sidecar was hard-wired and the socket, although there, was not used.
Cleaned it up and it tests out ok. The switch at the side of the socket is an on-on switch, so I will wire it so it can be used as both the sidecar lights and a 12v accessory socket through the switch.


**note to self - before applying the paint-spray can to the headlight, make sure it's the black spray and not the silver :blast
 

Attachments

  • old handlebar wiring.jpg
    old handlebar wiring.jpg
    52.3 KB · Views: 215
  • bars headlight.jpg
    bars headlight.jpg
    119.5 KB · Views: 215
  • speedo gromet.jpg
    speedo gromet.jpg
    25.8 KB · Views: 216
  • saddle support socket.jpg
    saddle support socket.jpg
    61.1 KB · Views: 215
Sorting out the electrics today. The loom is a generous length and I will have to lose it around the frame.
Re-assembling the ignition/ light switch was fun, and took me a while. It's in several parts including a spring, and is all held in the roof of the headlight case by 4 fold-over metal tags. I eventually made a tool out of some aluminium (pic 1) to hold the spring compressed while I placed all the other components over it and folded the four tags down. I had to have the headlight upside down to do this (pic 2) and had to cut the hooked end of the tool off to remove it.
Suprisingly, the headlight works !
Front end all but complete now.
 

Attachments

  • light switch tool.jpg
    light switch tool.jpg
    54.2 KB · Views: 197
  • headlight wiring.jpg
    headlight wiring.jpg
    105.9 KB · Views: 196
  • headlight on.jpg
    headlight on.jpg
    102 KB · Views: 196
  • front done.jpg
    front done.jpg
    106.4 KB · Views: 198
Spent a couple of hours today sorting out an electrical fault. I put a low amp fuse (5A) to the battery+ as I expected some problems, and it kept blowing fuses. Turned out to be a component inside the ignition/light switch which I had put in upside-down and was causing the switch to become live when I put the key in, it's an intermediate push-rod which connected a set of points, and had a non-metallic end. Very frustrating to diagnose, but a big sense of achievement when I finally sorted it. At least I already had the tool I made to enable easy re-assembly of the switch, but not helped by my cheapo continuity testers unwillingness to beep when a circuit was made, must get a new and better one.
The electrics were not a job I was looking forward to, a new loom and an upgraded and electronic ignition, but it all now seems to be doing the right things.
 
after some thought about trying to loose the 18" of extra loom length, I shortened it and attached new ends to the bare wires. I thought about wrapping the extra , but it looked too messy - even for me. Fitted the brake pedal, linkage and the brake light switch. Mounted the rear mudguard complete with it's top-box and wired it all up. All the lights seem to do what they should, I've even got a neutral light now!, and there's a spark at the plugs when I operate the kick-start, so I'm starting to see it taking shape, rather than a random selection of bits bolted together.
 

Attachments

  • mudguard n rear brake on.jpg
    mudguard n rear brake on.jpg
    115.4 KB · Views: 150
  • topbox on.jpg
    topbox on.jpg
    108 KB · Views: 153
Looking right lovely that is Bill :clap

If you are looking for any hard to find bits have a look here http://www.hobbyist.nl/ If you need a hand with the Dutch let me know but if you email them in English they will reply in English no problem.
 
Found room on the frame for the throttle cable splitter, but it's rather tight under there.
Fitted clutch and speedo cables as well. Throttle a little stiff when the tanks rammed in place, but it does return, so greased it up well and hope it gets a little easier over time. Horn has had to be located under the saddle.
Carbs in situ and cabled up, all 22mm of them!!
Had a call from Sid the wheel man, my sidecar wheel is ready, so a trip to collect it, and called at Bikerz Tyres on the way back saw a new rim-tape, tube and tyre fitted.
He's made a good job of the wheel, alli rim, stainless spokes and the hub blasted and painted all for a little over £100. Rim tape, tube and tyre £69.
 

Attachments

  • carb on.jpg
    carb on.jpg
    103.4 KB · Views: 129
  • tank seat carbs on.jpg
    tank seat carbs on.jpg
    110.7 KB · Views: 130
  • sidecar wheel tyre.jpg
    sidecar wheel tyre.jpg
    106 KB · Views: 132
Superb job Bill.::drool:drool
Looking forward to seeing her in the flesh again....:thumb2


Bleedin ell !!!
Proff, you've used up your 10,000 post on this thread !! :bow:bow

Keith, you can ride it anytime, be my pleasure.

finished putting it back together today, back wheel, carbs piped up etc, then off to the petrol station for a gallon of juice.

Checked and re-checked all the nuts, bolts, pipes, cables etc.
It was with a great deal of trepidation I plucked up the courage to stick the key in and put my foot on the kickstart and press down.
And press down, and press down , but after about 10 kicks it fired up !!!!
Admittedly a rather lumpy kind of fired up, but run it did, so off round the field I went.
Not running very smooth, only on the left hand cylinder, with the right kicking in when it felt like it, but running.
So I opened a bottle and got out the camera, and here it is.
Think I'll have the rest of the day off and look into the missfire tomorrow.
 

Attachments

  • complete left side.jpg
    complete left side.jpg
    109.3 KB · Views: 109
  • complete right side.jpg
    complete right side.jpg
    116.7 KB · Views: 109
  • running.jpg
    running.jpg
    117.8 KB · Views: 110


Back
Top Bottom