REPLICA MARLBORO PAINT JOB

There's no way she'll be ready for the weekend:( Not unless a team of BMW mechanics turn up at my house.
As far as getting a paint job, recon you'd be looking at late august:rolleyes:


Of course you could bring her and do a weeekend rebuild:augie now that would be a project:aidan.
You know it makes (no) sense.:hide
 
nice thought

Of course you could bring her and do a weeekend rebuild:augie now that would be a project:aidan.
You know it makes (no) sense.:hide

I won't have all the bits back in time.

Anyway did a bit more painting today before going out to the beach. Its all looking very much like the original now. Got a bit of touching up to do but otherwise i'm quite pleased.
 

Attachments

  • DSC02569_1834.JPG
    DSC02569_1834.JPG
    118.8 KB · Views: 589
  • DSC02570_1835.JPG
    DSC02570_1835.JPG
    97 KB · Views: 525
  • DSC02571_1836.JPG
    DSC02571_1836.JPG
    121.9 KB · Views: 512
Its not to bad

f:for my first ever replica tank job:D 
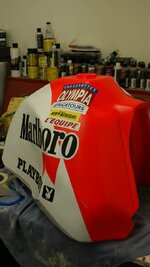
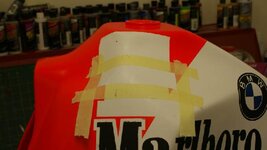
I could get into doing these. Today i shall be doing the other side which is a bit more complex :eek as one of the logo's is a sort of rainbow moving from one colour to another so i'm not quite sure how to do it at the mo. We'll have a play and i'll post later:thumb2
 
What's the general opinion of blokes who-
A. Get things done
B.In a timely fashion
C.with a high degree of competence
:D:D

Seriously- that looks the duck guts -good job :thumb
 
The final run.

Just so you guys can see how things like the logos are done i've one a step by step. :D

you'll see i left a space on the tank for the sponser decals to go. I start by masking off the area that going to be done.

I then remove the part of the stencil i want to paint leaving the mask.once applied we're ready to paint.

i'm using my Iwata Eclipse for this as its the dogs doodahs and its a twin action which means i've alot of control over the paint:augie

I apply paint in light coats setting it with a gentle blast of the heat gun.
 

Attachments

  • DSC02590_1866.JPG
    DSC02590_1866.JPG
    71.3 KB · Views: 549
  • DSC02591_1867.JPG
    DSC02591_1867.JPG
    82.6 KB · Views: 545
  • DSC02593_1869.JPG
    DSC02593_1869.JPG
    74.8 KB · Views: 546
  • DSC02595_1871.JPG
    DSC02595_1871.JPG
    75.6 KB · Views: 545
next

and to the next bit.

Once the desired no. of coats are on and its dryed we can remove the mask and hey presto we have a decal.

All are done in pretty much the same way but some may require a different base colour first.

All looks nice when here done. Had a few bits not go to plan but nothing that can't be fixed:augie
 

Attachments

  • DSC02597_1873.JPG
    DSC02597_1873.JPG
    73.9 KB · Views: 574
  • DSC02600_1876.JPG
    DSC02600_1876.JPG
    74.8 KB · Views: 537
  • DSC02601_1877.JPG
    DSC02601_1877.JPG
    87.1 KB · Views: 538
  • DSC02607_1883.JPG
    DSC02607_1883.JPG
    86.8 KB · Views: 538
All done

all finished now, just need to clear coat with about 10 goes:D done the motorsport stripes and had to relocat the BMW badge on the one side as it wouldny fit any other way :blast 
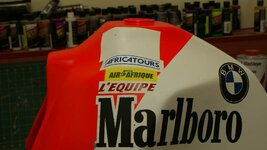
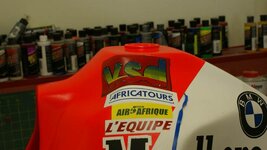
but overall its come out OK.

Hope i've not bored to many of you, some of its usefull to know :thumb

DSC02613_1889.JPG

DSC02612_1888.JPG

DSC02615_1891.JPG
 
Syco, are those wee imperfections at the top of the letter M from the paint or are they from the digital camera? If they are paint how do you go about fixing them?

A very interesting thread by the way. :thumb2

attachment.php
 
arr you spotted them

Syco, are those wee imperfections at the top of the letter M from the paint or are they from the digital camera? If they are paint how do you go about fixing them?

A very interesting thread by the way. :thumb2

attachment.php

they are bit of creep from the paint:blast they will be touched up and when under the clear will nearly imposible to see. unfortunatly these little things happen and you can either deal with it or go outside and cut your wrists. I'm sure the really good guys at this have all sorts of tricks they just haven't let me know:eek
 
Don't get me wrong Syco, I wasn't being at all critical.

I did suspect that they were "paint creep" and whilst avoiding it given the complexity of that job would be very difficult I am interested in learning how you fix them.
 
pretty simple really

Don't get me wrong Syco, I wasn't being at all critical.

I did suspect that they were "paint creep" and whilst avoiding it given the complexity of that job would be very difficult I am interested in learning how you fix them.

some deft masking and gentle airbrushing:D Thats the advantage of airbrushes. My Iwata will spay a line about 1/2mm wide but with my skill about 1.5mm:eek I've a lot of touch ups to do which you won't see once cleared unless you got very close and knew what your looking for:cool::D:D

You never know by the time ive done a couple of these i may have worked it all out but at present i'm learning as i go and its not something i've found a book on:D
 
some deft masking and gentle airbrushing:D Thats the advantage of airbrushes. My Iwata will spay a line about 1/2mm wide but with my skill about 1.5mm:eek

Now another distraction -I'm going to get my airbrush out and have a play on a sheet of cardboard. Bought it for artisitic purposes but this looks like fun if I can master it :confused:
 
You can buy some great masking tape that virtually eliminates paint creep, called 'coachliner' or 'Coachmaster' IIRC it's only thin but you can really push it down on the surface and it always comes off clean.

Sometimes using signwriting vinyl can cause 'bleed' but that's a reaction between the adhesive on the vinyl and any solvents in the paint system used.

Shep


Back
Top Bottom