1988 R80RT -> R80 Part 1

Well, after a couple of months of other diversions I've cracked on with the build this week.

Just debating what to do about the wiring at the moment. The old wiring harness is a big manky and needs adapting. I can't find one so I might bite the bullet and pay to have it wired. I could do it but I'm colourblind and it would be a pain in the arse. Also, I've spent so much money on the bike so far it would be a shame to "spoil the ship for an h'aporth of tar"........mmmm, decisions.
 

Attachments

  • P1070341.jpg
    P1070341.jpg
    84.2 KB · Views: 509
on my rt build I went down the moto gadget m unit road as my loom was a birds nest of shite
lots better
 
Well, after a couple of months of other diversions I've cracked on with the build this week.

Just debating what to do about the wiring at the moment. The old wiring harness is a big manky and needs adapting. I can't find one so I might bite the bullet and pay to have it wired. I could do it but I'm colourblind and it would be a pain in the arse. Also, I've spent so much money on the bike so far it would be a shame to "spoil the ship for an h'aporth of tar"........mmmm, decisions.

Sort the wiring properly, as you say not worth spoling the ship for a h'apporth - unlikely you will have it apart this much again so get in there while its like it is, nice and accessable. It will be worth it in the end.

Looking good BTW :thumb2
 
Wiring loom

I do have a good second hand main wiring loom which I bought from Motorworks for my 1987 R100RT around ten years ago. Never used it so it's still here. I recall that it cost me around £60 when I bought it and you're welcome to have it for that if you're interested. Happy to send it to you to have a look at and Paypal me the cash if you feel it'll help.
Good luck with the build,
Dave.
 
If you've ditched the fairing why not get a good used loom for an R80R of the right year?
 
I do have a good second hand main wiring loom which I bought from Motorworks for my 1987 R100RT around ten years ago. Never used it so it's still here. I recall that it cost me around £60 when I bought it and you're welcome to have it for that if you're interested. Happy to send it to you to have a look at and Paypal me the cash if you feel it'll help.
Good luck with the build,
Dave.
I'd be interested in this Dave. To save any messing about maybe you could send me a few pics of it so I can judge if it's significantly better than the old one? Let me know and I'll pm my email address.
Cheers
David
 
If you've ditched the fairing why not get a good used loom for an R80R of the right year?

Thanks for the suggestion Packer. I have tried the usual sources for an R80 one but I will have another go if all else fails.
 
I've made a bit of progress in the last couple of days.

Next step is the wiring. I've cleaned up the old loom and it isn't bad at all so I've decided to stick with it. It has the benefit of 'memory' so it should slot back into place easily.

I did buy the loom from 'oldenoughtoknowbetter' so if anybody wants it I'll pass it on, posted, for £60 which is what I paid. He did say that he'd had an enquiry about it.
 

Attachments

  • IMG_2615 - Version 2 (1).jpg
    IMG_2615 - Version 2 (1).jpg
    64.8 KB · Views: 362
  • IMG_2617 (1).jpg
    IMG_2617 (1).jpg
    71.8 KB · Views: 357
  • IMG_2618 (1).jpg
    IMG_2618 (1).jpg
    61.3 KB · Views: 357
Im lovin it. Nice job

I know this ISNT going to be an RT now, but I really miss my RT, and when and if I have the funds, I shall buy another one!
 
Thanks.

Sadly my wife died last May after a short illness. I started the project as a bit of a diversion while I was looking after her.

Oh no really sorry to hear that, feeling awful now.
The finish so far on the bike is a credit to you.
 
Not wishing to hijack this excellent thread..........but when an R80RT landed with me it went from this

001%20It%20looked%20like%20this%20originally.jpg


to this!

DSC_8235-X2.jpg
 
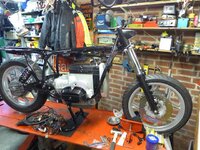
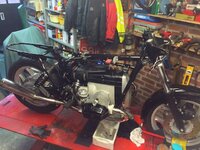
A bit stop start this project but even though it might not look it I've made a lot of progress over the last few days. To be fair I have done a lot of work this summer on other bikes....

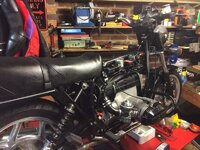
Anyway the main work has been sorting the wiring out which is just about done. I will need to tidy up the runs but I'll do this once I've got the cables installed and get it off the bench. I need to be able to move the forks around and also satisfy myself that I'm happy with the bars before I settle on cable lengths.

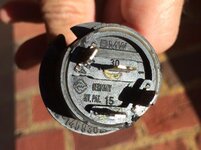
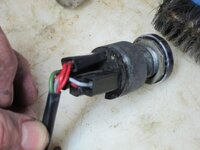
I am having a bit of an issue with the ignition switch. The original one pictured is the 5 pin one which was mounted in the fairing and is installed temporarily. The centre two pins appear to be both numbered 30. The switch I want fits in the centre of the plastic console as shown. I tried the usual suppliers for the correct fitting one but the best I could do was get the 4 pin one shown from Sherlock FOC as it was part of a big order and no guarantees it would work. Well I've tried most obvious combinations of connection and I can't get the Sherlock one to work. Two possibilities: 1. It's broken 2. Which is quite likely, I've not got the right connections made. I assumed 15->15 and 30->30 to start which seem correct from the wiring diagrams. The hidden pin number on the 4 pin switch is 58E. According to the Haynes manual this is the correct switch for my bike but my wiring colours don't match (but I am colour blind.......:blast).

Incidentally the wiring diagrams are one area where it seems the Haynes wins over the Clymer manual.

I can make up a fitting for the original switch but would rather get the right one. Anybody got an idea of the correct way to make the connections or have a suitable one for sale?

One more thing, the yellow wire in the heated grip harness shown gets almost too hot to touch when it's on Low setting. I assume this is a resistance wire. Is it normal for it to get so hot?

Cheers

David
 

Attachments

  • IMG_3132.jpg
    IMG_3132.jpg
    86 KB · Views: 385
  • IMG_3133.jpg
    IMG_3133.jpg
    64.6 KB · Views: 390
  • IMG_3129 - Version 2.jpg
    IMG_3129 - Version 2.jpg
    62.1 KB · Views: 465
  • IMG_4451.jpg
    IMG_4451.jpg
    39.1 KB · Views: 414
  • IMG_4445.jpg
    IMG_4445.jpg
    44.8 KB · Views: 385
Update! I've got the 'new' switch working and I know there's not a man amongst you who won't be relieved to hear that :D 
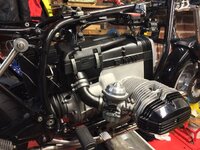
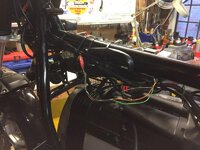
The problem I've had is that the colouring of the wires doesn't tie in with any of the wiring diagrams in the manuals :nenau Too many reds......at least I think there are....
 
How did you get that finish on the crankcases? I read you blasted the timing cover etc but no info re the crankcases. Sorry if I missed something.
 
How did you get that finish on the crankcases? I read you blasted the timing cover etc but no info re the crankcases. Sorry if I missed something.

Hi Scot. See post #18. The only parts I hadn't had cleaned up by R D Cox in Reading (shot blasted/painted or vapour blasted) were the new crankcases and gearbox. Oh, and the final drive which I did myself. Scrimingers vapour blasted (I think) the cases and gearbox when they swapped the cases over and built the engine and refurbished the gearbox.

I made the decision to get Scrimingers to do that work as I was going to be passing their doorstep at the time and wanted to know the 'core' of the bike was solid so I could get on with the rest of the project.

Cheers

David


Back
Top Bottom