Camille's big rebuild

Well, here we go again

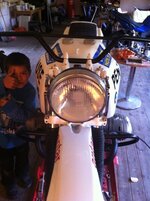
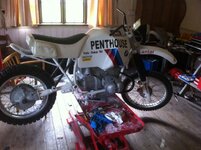
Picked up a headlight yesterday for camille and couldn't wait to fit it. Bolted everything in place and stood back to admire. Then it hit me, a quick look at my collection of photo's and yep it's all wrong. Too high, to far forward so out with the ruler and some deft scribbling and we're back on track. Sooooo tomorrow I'm off to me mates to do a spot of welding and fabbing.
I've also spoken to the guy in the states And my shocks are now in the post and winging their way over. Oh and last but not least camille may be off to bristol for a few days having her headlight cowl and rear mudguard made and possibly an undersea tank.:D
If it's worth doing it may as well be done right:thumb2
 
fabing and welding today

well today with the help of chris the master welder we've been making a headlight bracket. fits real nice but i'm not sure about the height as i feel it may be 1/2 inch to high:confused: 
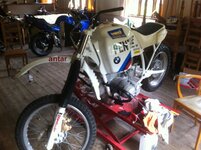
I may just have to live with it as it is. anyway the light mounts nicelly and theres room for the clock mount so all i have to do now is get the clock mount laser cut and weld the tabs on and were ready to go to Bristol.
Rossi checked her out for size but reconed the reach to the bars was a bit far for him:D
 

Attachments

  • 187.JPG
    187.JPG
    61.6 KB · Views: 550
  • 188.JPG
    188.JPG
    117.5 KB · Views: 552
  • 189.JPG
    189.JPG
    78.6 KB · Views: 548
  • 191.JPG
    191.JPG
    65.5 KB · Views: 550
More fabbing

Done a clock mount today so once I've the oil temp gauge I can mount them and see how it all looks. I've got to fab up a brake lever for the rear and some stays which will hold the swingarm so I can put her on her wheels and send her down to Bristol. A new centre stand is now being scribbled up for fabbing at the weekend and that's about it fer now. Hopefully I'll get the ohlins by the end of the week, and Motorworks are sorting put some bits n bobs.
I've found a compass like the one used originally, since I found a shot of the Fairing with the compass mounted on the inside of the screen, the only issue is the one I've found is without liquid, any ideas what liquid was in old aircraft compass's
 
Glycerine

Can be got from cook shops, chemist etc.:thumb2
Find somewhere you can drill a small hole, drip the glycerine in the seal the hole. Remember to leave a small bubble of air

HTH
Neil
 
Thanks chap

The one I've bought is an old airpath and I blelieve you can buy a repair kit for them that's got new seals etc, but I can't seem to find a company in the uk that sells em. Any ideas.
 
thanks guys

Paint it all matt black...looks like a gay drug sellers bike !!
Just kiddin' tis an absolute credit to you :thumb2

first bike rebuild and it's been kinda fun so far. Anyway today i finished the clock mounts now i just have to remake the plate that holds the clocks:blast 
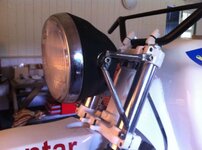
wasn't happy with it anyway:D i've made the suspension stays today so i can put her on her wheels for the trip to bristol and thats about it. bought some more stainless nuts n bolts and a couple of taps so now all i need is to find a box trailer to get her down south.
all good fun this bike building, may start a business called SAB for Syco's adventure bikes:D then again maybe not:rolleyes:
 

Attachments

  • 005.JPG
    005.JPG
    84.3 KB · Views: 381
  • 002.JPG
    002.JPG
    87.4 KB · Views: 383
Looking good Si, mind you those front discs look a bit on the small size:D
Would these be any good to you;)
 

Attachments

  • R100RT 1 004.JPG
    R100RT 1 004.JPG
    95.7 KB · Views: 376
Well off she went

To Bristol today to have some glass finer bits made. Hired a big box trailer so she'd be safe and f**k me if she didn't go and fall over:blast even though I strapped her down with six tie downs. So now I've got to get the crash bars and rear subframe re powder coated:blast that should really please my mate as this will be the third time he's done them:(


Back
Top Bottom