Here we go again!

Cheers Ken. :thumb2

Tim, There was nothing wrong with the bike, especially taking into account your intended use as a simple, reliable means of transport. Take some comfort in the knowledge that if it was sold to you as having been recently serviced, all the signs are that it had been (only the front brake pads were marginal but they were probably passable when it was serviced).

The point of this is to take a sound, low mileage bike and turn it into a long-term "keeper". I have the time and the inclination to do it that's all (oh and I know that the new owner has a need for something to polish between now and getting my K1 having sold his GSA to Mike O :D).
 
Mike you have seriously missed your calling:thumb2
The attention to detail on this re-build and the process of writing and posting about it at the same time.
I doff my cap to you sir:bow:bow:bow
:flag
 
Apologies to my loyal reader, the delay in updates is due to some of the panels requiring further work and the owner's desire to get his grubby mitts on the nice clean parts before re-assembly goes any further.

Well that and the fact that much of what I've been doing lately is repetition of stuff I've done before such as the rear wheel getting the same treatment as the front.

There should be something worth adding by the middle of the week.

:thumb2
 
Much of what's been done lately has been reported before but here's some of what I've been up to lately:

The cam and crankcase covers have been given several coats of paint. The relatively lower temperatures lately have slowed the process a bit, in fact once they were dry enough I transferred them to the bedroom radiator to get a bit of heat into them:

BMW%20K75S%20%28298%29-L.jpg


After a few hours of that I could strip off the masking:

BMW%20K75S%20%28300%29-L.jpg


There's always a bit of paint creep under the edges of the masking as the edges are never exactly square. A quick going over with a fine grit block sorted that out:

BMW%20K75S%20%28301%29-L.jpg


The paint needs to be harder before it can be polished to remove any bloom and the best way to do that is to let the engine heat finish the curing. In the meantime they can be set aside:

BMW%20K75S%20%28302%29-L.jpg


The gaskets were stripped of old silicone, then cleaned:

BMW%20K75S%20%28290%29-L.jpg


I've never had to replace one of these gaskets yet but there is a knack to re-fitting them.

BMW%20K75S%20%28291%29-L.jpg


The rear wheel has been given the same treatment as the front starting with a quick wash and then setting about removing the clear-coat over the bare detailing that has failed and allowed corrosion to creep under it. A medium grit block and elbow grease avoids gouging the soft aluminium (softer on these later wheels and probably one reason why they suffer more from corrosion):

BMW%20K75S%20%28294%29-L.jpg


Once the bare ali is polished on goes the masking and the first coat of paint:

BMW%20K75S%20%28299%29-L.jpg


Two coats is enough and then the masking is removed (it's not hard enough yet to deal with any paint creep):

BMW%20K75S%20%28303%29-L.jpg


The handlebars have been re-sprayed and now back on with the crash pad and switch gear:

BMW%20K75S%20%28295%29-L.jpg


Cables and wiring re-routed:

BMW%20K75S%20%28296%29-L.jpg


All the other little bits and pieces have been getting the cleaning/polishing treatment:

BMW%20K75S%20%28305%29-L.jpg


BMW%20K75S%20%28306%29-L.jpg


BMW%20K75S%20%28304%29-L.jpg


I've replaced many of the various fasteners or cleaned them where I don't have new screws and bolts of comparable sizes.

The rear mudguard has been cleaned. I give plastics a wash with soap and water and then use a cutting compound followed by normal polish to protect it. It's amazing how much grime get ground into plastic.

BW%20K75S%20%28308%29-L.jpg


More soon.
 
The rear section of the mudguard has been given the same clean and polishing treatment:

BMW%20K75S%20%28311%29-L.jpg


Then I turned my attention to the Motometer. My MO with these is to remove the cover to check for leaks. It's a simple check, remove it and fill it with water then see if the water escapes via the silicon that's used to hold the clear face in the body. It's a fifty-fifty chance that it will leak somewhere and if it does it's a simple fix:

K75S%20%2860%29-M.jpg


It also needs a clean:

BMW%20K75S%20%28312%29-L.jpg


Keep turning the cloth:

BMW%20K75S%20%28315%29-L.jpg


BMW%20K75S%20%28322%29-L.jpg


Two other jobs that I do when inside: First is to clean the blades of all the contacts:

BMW%20K75S%20%28317%29-L.jpg


Second is to tweak-out the under-read in the speedometer:

BMW%20K75S%20%28316%29-L.jpg


I've done it often enough to know the amount to turn the adjuster but it will be checked against a SatNav on the local measured mile once the bike is back on the road and adjusted further if needs be.

At long last Ryan was able to get away from work and the new baby so we began putting some of it back together. The gearbox, starter and alternator going back in/on:

BMW%20K75S%28309%29-L.jpg


It doesn't take long to have something approaching a bike again:

BMW%20K75S%28311%29-L.jpg


BMW%20K75S%28310%29-L.jpg


The grubby finger-marks will be removed in due course:

BMW%20K75S%28313%29-L.jpg


BMW%20K75S%28315%29-L.jpg


A bit blurry but it serves a purpose:

BMW%20K75S%28314%29-L.jpg


At present I'm feeding the rigid brake lines from the front ABS modulator back through to the front, re-connecting all the electrical connectors and will soon drop the new battery in to check things over.

I still have to fit the new brake lines at the front, bleed the brakes and a thousand other small jobs.

One major problem has arisen: The replacement main-stand from a 16-Valve bike was tatty, I've cleaned to, removed a little from the inside of the "feet" to increase clearance (the shorter wheelbase of the older bikes means that the wheel is close to the stand when it's retracted). When the stand was painted and drying I hang it on the swivels through a piece of tube. When I did so I noticed that the nearside swivel is twisted slightly. It needs to be straightened before I go any further or it will just wear-out the pivot pin rapidly.
 
The front ABS modulator is back on and the brake pipes fed through. It was less awkward than I had supposed, still a bit fiddly though. New battery in place too:

BMW%20K75S%20%28331%29-L.jpg


Jetronic and tool tray back:

BMW%20K75S%20%28332%29-L.jpg


The next job was to sort this out:

BMW%20K75S%20%28178%29-L.jpg


I've swapped to the later 16-Valve stand before. It isn't quite as straight-forward as just unbolting one and fitting the later type. In this case, there was an added problem in that the replacement stand was not only "well used" but it turned out to be twisted too.

First it was stripped to bare metal and then I built up several coats of paint with a flatting back between:

BMW%20K75S%20%28313%29-XL.jpg


It was when I looked down over the top as the paint was drying that I saw how badly twisted it was:

BMW%20K75S%20%28309%29-L.jpg


Into the vice and a swing on a long bar saw the twist removed:

BMW%20K75S%20%28310%29-L.jpg


After more paint, the parts are ready for re-assembly (new pivot pins):

BMW%20K75S%20%28333%29-L.jpg


One of the things that I do these days is to wrap the crossbar with helicopter tape to reduce the stone chipping they are always prone to:

BMW%20K75S%20%28334%29-L.jpg


Before going further with the stands, it's time for the silencer to go on because it determines where and how the stands park. A new seal as they always turn to dust:

BMW%20K75S%20%28336%29-L.jpg


BMW%20K75S%20%28337%29-L.jpg


Doing this conversion there's always a bit of fiddling and sometimes some trimming with a grinder to do. In this case the main stand lever needed bending outwards to clear the silencer:

BMW%20K75S%20%28339%29-L.jpg


I was going to use a spare side-stand that I had kicking around but when offered up I discovered that it was a 16-Valve stand (they are slightly shorter and angled differently):

BMW%20K75S%20%28340%29-L.jpg


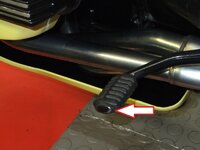
Putting the original, tatty, side stand back on, it fouled the main-stand slightly. The foot needed a little metal taken off at the inside edge:

BMW%20K75S%20%28342%29-L.jpg


It's a case of trim and check it by offering it up. If you do this swap yourself, don't put the springs back on or you'll be forever pulling them back off. Once it all fits properly it can be re-assembled off the bike. It's much easier to get the springs on rather than when the stands are back on the bike (the tongue thing is the rear mounting for the K75S belly-pan):

BMW%20K75S%20%28335%29-L.jpg


Both stands park properly in the nice new rubber bump-stop:

BMW%20K75S%20%28343%29-L.jpg


And clear the silencer properly above:

BMW%20K75S%20%28344%29-L.jpg


Another thing I did was to remove some metal from the left side "foot" of the stand. There is enough clearance without but it's tight. It shows the difference in the wheel base between the Paralever and non-Paralever models.

BMW%20K75S%20%28345%29-L.jpg


This swap gives you a more robust stand that has the benefit of having grease nipples in the pivots for servicing.

The twist in the main-stand was probably caused by the practice of spinning the bike on one foot, something I'll admit to doing often myself. The state of the old pivot pins (photos further back in the thread) was an indication of how much it was twisted.

The clutch has been adjusted and the side-stand retractor connected and adjusted too.
 
You can just about spot the new Gucci BMW dust cap!! :D
Well I wasn't going to post this but:

BMW%20K75S%20%28343%29-L.jpg


Oh and one of it back on it's feet so I can get on with the other bits now:

BMW%20K75S%20%28344%29-XL.jpg
 
Thought I'd re-fill the forks while I had a few minutes to spare. I've always found that 10 weight oil works well in K-Series:

BMW%20K75S%20%28345%29-L.jpg


This is just a part of getting the front finished including popping in new pads before re-fitting the callipers:

BMW%20K75S%20%28350%29-L.jpg


The fairing 'spider' cover is back on and that allows me to replace the old and crumbling foam strip:

BMW%20K75S%20%28346%29-L.jpg


I used the single-sided adhesive 3M stuff recommended earlier in the thread. :thumb2

BMW%20K75S%20%28347%29-L.jpg


That done, I can offer-up the front, upper fairing panel:

BMW%20K75S%20%28348%29-L.jpg


Once happy that the foam strip is in the correct place, I fitted the new graphite badge and the headlamp to the panel. There's a small amount of side-to-side adjustment available on the headlamp mounting and centring it has to done while it's off the bike:

BMW%20K75S%20%28349%29-L.jpg


A new rigid brake line is fitted. The ABS bikes have one line to the offside calliper and then the callipers are linked by the rigid pipe. Although it's plastic coated the location under the mudguard leaves it prone to corrosion. The original one wasn't bad but it wouldn't have been long before it got worse:

BMW%20K75S%20%28351%29-L.jpg


I've shaped this one to sit under the fork brace so that it doesn't have a chance to distort the plastic mudguard.

There's another short rigid pipe from the offside calliper to the flexible hose. This too has been replaced:

BMW%20K75S%20%28352%29-XL.jpg


With all the brake lines connected, I've begun the bleed.

The first thing with these ABS I bikes is to bleed the modulators. I 'primed' it with some fluid by syringing some clean fluid in via the bleed nipple and then it's a fairly normal bleed process, modulator first and then the callipers:

BMW%20K75S%20%28353%29-XL.jpg


It took a lot less time and effort to bleed the front brakes than I'd anticipated. Having just the one bleed nipple for the pair of callipers seems to be an advantage.

The rear is proving more stubborn. Once it's done I can roll the bike of the stand and use the front brake to bounce the suspension a couple of times before doing-up the axle pinch bolts, re-fit the fork brace and check torque the lower steering clamps.
 
I found that a copper washer wasn't seat properly on the rear brake master-cylinder. One good thing about the rear brake is that the whole lot can be removed together so that I could check it over on the bench:

BMW%20K75S%20%28355%29-L.jpg


In between pumping away at the rear brake, I set about cleaning up the top-case:

BMW%20K75S%20%28357%29-L.jpg


Then put some more of the single-sided self-sticky foam tape in place to prevent the top-case rattling and scuffing the carrier:

BMW%20K75S%20%28359%29-L.jpg


I've also sorted the case lid lock (it was poorly adjusted, a simple matter to get it to close nice and tight). Then with the foam tape in place, offered it up and bingo it's nice and snug:

BMW%20K75S%20%28360%29-L.jpg


The re-painted panels need the inside painting so masking and re-spraying has been going on:

BMW%20K75S%20%28363%29-L.jpg


BMW%20K75S%20%28362%29-XL.jpg


BMW%20K75S%20%28361%29-L.jpg


Before:

BMW%20K75S%20%2829%29-L.jpg


After:

BMW%20K75S%20%28364%29-L.jpg


Before final assembly I laid a five inch width of helicopter tape down the centre of the belly-pan where it gets stone chipped. Then I offered it up to re-adjust the disturbed fittings to ensure the correct gaps.

BMW%20K75S%20%28365%29-L.jpg


Looking back at the photos of the bike shortly after it arrived, the belly-pan was too close to the engine casing. Then:

BMW%20K75S%20%2817%29%20-L.jpg


Now:

BMW%20K75S%20%28370%29-XL.jpg


BMW%20K75S%20%28366%29-XL.jpg


The upper fixing bracket hooks onto the radiator mounting nicely now:

BMW%20K75S%20%28368%29-L.jpg


The helicopter tape is almost invisible:

BMW%20K75S%20%28367%29-L.jpg


And the visible area looks better:

BMW%20K75S%20%28369%29-L.jpg


Back to pumping that rear brake now.
 
Very good Mike:clap


Missed a bit though:D
 

Attachments

  • BMW%20K75S%20(369)-L.jpg
    BMW%20K75S%20(369)-L.jpg
    101.1 KB · Views: 729
BMW%20K75S%20%28369%29-L.jpg


Back to pumping that rear brake now.[/QUOTE]

I know I don't know much about theses bikes but I think you will find that's the gear lever!

Fantastic thread and the photos are so useful to me for showing where all th bits should go, thanks.

Still prefer the blue though

John
 
With the rear brake and attendant plumbing removed from the bike yet again, I discovered that the ABS modulator bleed nipple had been over-tightened at some point and as a consequence the threads were partially chewed. The meant that it wasn't actually closing the nipple fully and air was getting back into the unit:

K75S%20002-L.jpg


My first thought was to use a spare bleed nipple but wouldn't you know it FAG decided to use a non-standard diameter and depth. Okay, simple enough, order a new bleed nipple but no-one sells them separately (well BMW, Moto-bins nor Motorworks do).

How about the whole cap that the nipple fits in:

BMW%20K75S%20%28375%29-L.jpg


Nope. It's either a new modulator at over a Grand from BMW, a second-hand one from Motorworks, about eighty quid or Ebay where they go for various prices.

A comparable aged one was found for under thirty quid delivered. Still pricey for a bleed nipple but beggars can't be choosers etc. It arrived yesterday and as the body was tattier I swapped the cap over and now it all works fine.

The final drive has been given fresh oil as has the gearbox here with the C-Spanner/gearbox dip-stick checking the level:

BMW%20K75S%20%28372%29-L.jpg


Now it's mainly bodywork stuff prior and a run-up before final re-assembly. I've replaced the long screw that goes through the fork brace to support the two halves of the front mudguard with a stainless one.

The location is exposed to all that the front wheel can chuck at it so to give it a bit of protection I've sleeved it with heat-shrink:

BMW%20K75S%20%28376%29-L.jpg


Then it's back on with the brace and the two halves. This is a fiddly job because the brake line has to be positioned in the cut-out and the rubber grommet always pops out just as it's all lining up. It's done:

BMW%20K75S%20%28378%29-L.jpg


BMW%20K75S%20%28379%29-L.jpg


I have to finish off painting the insides of the main fairing panels, then I can stick a couple of litres of fuel in the tank to see if it runs properly.


Back
Top Bottom