Palerider
Registered user
I realize that there are a number of good posts on fitting a Stebel Nautilus horn, but no matter how many times I looked I couldn't find a thread on how to fit the Stebel Magnum to my GS Adventure (forgive me if someone has and I'm just being thick!!). Now my GSA has ESA, ABS and ASC, so there's not much space anywhere at all!
So, here goes- my attempt at showing you my "solution"....
1) First step I undertook was to remove the front beak and bodywork around the front of the bike - I'm sure this is covered elsewhere so I'm not going to go over this again.
2) Remove the original horn from the frame. You'll find you can only really get at it using a star torx key (I use some from Halfrogs ) - no socket will fit in that tight gap and it's a bit of a squeeze but it does come off. Of course disconnect the canbus plug that it is connected to.
3) Throw over shoulder...er.... ....keep in a safe place just in case you need it again!!
4) Figure out where the heck you're going to put the Magnum....boy, it's a big sucker!!.
I thought it would go here;

But then I realized it would foul the brake and ABS lines when going over the bumpy stuff (or worse!).
Then recalled a mention in one thread of using the carbon canister cut out. So, a few minutes of trying for fit and head-scratching on the bracket side, I put this in place....

With the horn fitted it was apparent that water wouldn't necessarily drain out of the horn due to the angle of the dangle.

So....drill out and....

et voila! I have a holey horn ...so assisting with any water laying in the horn (no point in inviting moisture to stick around is there???
 )
)
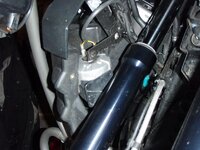
Also needed to check clearance on full right lock against the right strut....the old finger test works for me....

I didn't order the canbus wiring loom http://www.nippynormans.com/prodinfo.asp?number=STB-CANBUSKIT&variation=&aitem=1&mitem=9 so I decided to snip the plug off, expose the wires and solder an "extention" on using my home made wiring loom. Naturally, I shrink-wrapped both bare soldered wires with some wire insulation before completing a overall sleeve for the loom. You can see this in one of the previous images
Final wiring (yes, I used some old housing wire....What can I say, I'm a cheapskate!) and all connected up.

Side image complete, including some trusty ZIP ties....

And boy, it's LOUD!!!
Hopefully this quick image-guide will somehow assist greater-horn seekers in their quest of fitting such a large item in a space that's quite tight....ahem! .
.
Alternatively, feel free to take the piss out of my poor wiring, diction and awful humour.... onyack
Best
P
So, here goes- my attempt at showing you my "solution"....
1) First step I undertook was to remove the front beak and bodywork around the front of the bike - I'm sure this is covered elsewhere so I'm not going to go over this again.
2) Remove the original horn from the frame. You'll find you can only really get at it using a star torx key (I use some from Halfrogs
) - no socket will fit in that tight gap and it's a bit of a squeeze but it does come off. Of course disconnect the canbus plug that it is connected to.3) Throw over shoulder...er....
....keep in a safe place just in case you need it again!!4) Figure out where the heck you're going to put the Magnum....boy, it's a big sucker!!.
I thought it would go here;

But then I realized it would foul the brake and ABS lines when going over the bumpy stuff (or worse!).
Then recalled a mention in one thread of using the carbon canister cut out. So, a few minutes of trying for fit and head-scratching on the bracket side, I put this in place....

With the horn fitted it was apparent that water wouldn't necessarily drain out of the horn due to the angle of the dangle.

So....drill out and....

et voila! I have a holey horn
...so assisting with any water laying in the horn (no point in inviting moisture to stick around is there???)Also needed to check clearance on full right lock against the right strut....the old finger test works for me....

I didn't order the canbus wiring loom http://www.nippynormans.com/prodinfo.asp?number=STB-CANBUSKIT&variation=&aitem=1&mitem=9 so I decided to snip the plug off, expose the wires and solder an "extention" on using my home made wiring loom. Naturally, I shrink-wrapped both bare soldered wires with some wire insulation before completing a overall sleeve for the loom. You can see this in one of the previous images
Final wiring (yes, I used some old housing wire....What can I say, I'm a cheapskate!
) and all connected up.
Side image complete, including some trusty ZIP ties....

And boy, it's LOUD!!!
Hopefully this quick image-guide will somehow assist greater-horn seekers in their quest of fitting such a large item in a space that's quite tight....ahem!
.Alternatively, feel free to take the piss out of my poor wiring, diction and awful humour....
onyackBest
P
 that was blocking a road junction.