Oh dear.... what have I started.

Hi Rob, I would be interested in knowing in what way you are iffy on the blasting. The kit you have does seem to be a basic thing possibly for small items like carbs. I intend to use about 80 to 100 psi. I also have access to a pressurised hopper and according to the guy at MSB it should do the job ok. We will see.
I have tried T euro but although it does seem to clean the alloy it is slow going and as I want to get right into the fins I think it would be an awful job, unless of course I am doing it wrong. I only have a s/s brush a bit like a toothbrush so maybe its the brush that isnt up to it.:augie
 
I'll be interested in seeing how your soda blasting comes out. I bought one of these from machine mart http://www.machinemart.co.uk/shop/p...ndblast-kit-pick-up-hose?da=1&TC=RV-000510004 limited success so far.

That's what I use Rob with the smallest nozzle and the compressor (15 cfm) running at at least 100 psi -getting good results at this. As mentioned before I make a slurry with the soda and add some truck wash to enhance the cleaning power and assist keeping the soda in suspension. May be try turning up a smaller nozzle to concentrate the soda.
 
As no one has posted a description of how to do it I thought I would show my effort.

DOH :blast

Sorry . . . been concentrating on Landcruiser gearboxes and forgot.

Put it down to old age (my family no longer leave messages with me) :rob.

(Well, I am older than Proff :thumb).

However, you did it the way I did it so I wouldn't have added much.

Bob.
 
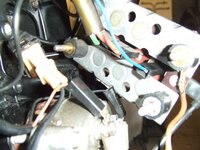
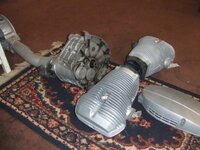
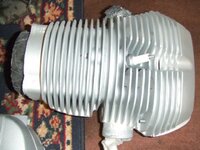
Ok, bit of an update. Ive boxed the engine up so that its ready for the soda blasting and ordered the soda and a regulater valve from a firm called MSB, somewhere ooop north, should be here by thursday. I will post some pics on this subject when we start:augie.
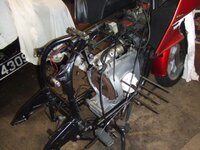
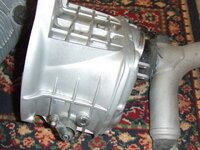
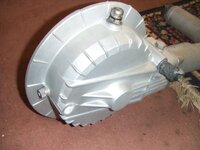
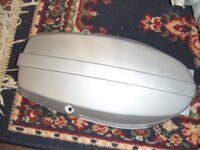
Ive also degreased the gearbox in readyness for the same and also the swingarm and diff. Now I have a bit of a quandry. The swingarm has been touched up a few times in the past and so looks a bit rough. Ideally I suppose it would be best to strip it and powdercoat but that means getting the driveshaft out and I dont have a spring compressor. I could just paint it with hammerite like the frame but I wonder how long the paint would last. anyone done it? still I suppose just doing the swingarm again if it doe'nt work is not the end of the world.

The hammerite will last longer than you !!! That is the route I have gone before with excellant results.

Cracking 'write-up' as well :thumb2
 
I just use a vice and a bearing splitter to get the drive shafts apart but to be honest the hammerite solution works for me.
 
Kenny, thanks for that,not quite sure how to take it though, with my present health condition, lets hope that is measured in lots of years.:augie:augie Now that Ive made you feel bad, thanks to you and Rob, Hammerite is the wayI will go.
Spent a bit of time today cleaning up the exhaust pipes. Solvol and a buffing mop brought them up very well. They are Keihans and in pretty good condition.Recon she will look quite smart when finished.
 
hehe

You will be too busy playing daddy and changing nappies not mention catching up on sleep to do that:comfort

what do you recon, flips sitting thinking this baby larks a piece of piss and it'll all do itself:D someone forgot to tell him, his job didn't finish when he jumped off lizzy,and dried his dick on the drapes:D

by the way your doing a grand job pops:thumb2 When you coming up here to put camille back together:blast
 
Hi chaps, looks like I'm back on track now with the rebuild on the RT.
So here is the update.
I have now exhausted all the options on cleaning the alloy bits. Soda blasting did'nt work on the barrels, gearbox or diff though it did a great job of the carbs. So now the only option seems to be grit blasting. went to a local specialist who stated they could do the job by squirting the bits with aluminium oxide. I boxed up the cylinders complete with heads and rocker covers and taped up all the holes same with the gearbox and diff/ swingarm.
shoulod have them back in a couple of days so lets hope I will get the finish I am hoping for.

I stuffed the crankcase back in trhe frame and connected the alternator and diode board and connected up the wires. Now a bit of advice please.
Am I correct in thinking the three wires that go from the back of the diode board to the alternator can be connected in any order. Seem to nremkember that from somewhere.
The two short brown wires that are connected to the casing mounting bolts
do they connect to the diode board end of the rubber mounts.
Lastly, the engine mounting bolts have spacers between the frame and crankcase... are they all the same thickness. I seem to have one attached to the sidestand mount plus two others of the same thickness, I am assuming I have another hiding somewhere . :D
 
Am I correct in thinking the three wires that go from the back of the diode board to the alternator can be connected in any order.

Yup. Three phases in any order

The two short brown wires that are connected to the casing mounting bolts
do they connect to the diode board end of the rubber mount.

Earth wires. Chuck em and use metal/alloy mounts.

Cheers,
John
 
Got a bit more done today. I connected up all the gubbins in the front casing. Alternator, bean can and diode board. all went well until one of the wires must have come off the back of the diode board. a blue one that is in the same loom as the black that goes to the solenoid. I think I have positioned it correctly to the rear of the diode board as in the photo. Am I right, opinions please?
I also replaced the starter, looks pretty new too and the sidestand. bugger to get the spring on though
Then I had a bit of a clean up in the work area. I am a bit of a messy bugger , didnt know I had so many tools.
Just waiting for the heads, barrels,gearbox and diff to come back from the blasters then I can really get going:aidan
 

Attachments

  • R100RT 004.JPG
    R100RT 004.JPG
    71.6 KB · Views: 360
  • R100RT 006.JPG
    R100RT 006.JPG
    79.1 KB · Views: 362
Got the bits back from the blasters today, super job too. I had taped everything up and so there is no sign that any dust got into the gubbins:augie
The barrels and heads will go off to my mate steve who will clean them properly and then do the valveguides and seats. its all go now.
 

Attachments

  • R100RT 002.JPG
    R100RT 002.JPG
    72.5 KB · Views: 298
  • R100RT 003.JPG
    R100RT 003.JPG
    72.3 KB · Views: 310
  • R100RT 004.JPG
    R100RT 004.JPG
    73.1 KB · Views: 305
  • R100RT 006.JPG
    R100RT 006.JPG
    55.7 KB · Views: 295
  • R100RT 007.JPG
    R100RT 007.JPG
    67 KB · Views: 301


Back
Top Bottom